Almost Blogger तो Email Subscription के बारे में जानते ही है. और वो इसके Importance के बारे में भी जानते है. आज हम इस Post में आपको Blog में Email Subscription Widget को Add करने के बारे में बताने जा रहे हैं.

Email Subscription आपके Reader को Email के द्वारा New Post की Notification भेजता है। इसके लिए आपको पहले तो Feedburner में Account बनाना पड़ता है उसके बाद Feedburner Account में Email Subscription Activate करना होता है फिर उसके बाद आपको अपने Blog में Email Subscription Widget को Add करना होता है। जिससे Visitor आपके Blog में Email Subscription के द्वारा Feedburner में Subscribe कर सकता है।
अगर आप सोच रहे होंगे की Feedburner Email Subscription क्या है तो में आपको Short में बता रहा हूँ की अगर कोई Visitors आपके Feedburner से Subscribe करेगा तो जब भी आप अपने Blog में Post Publish करोगे तो उसे Email के द्वारा Notification मिल जायेगा. ये Old Visitor को Blog में लाने के लिए सबसे अच्छा तरीका है।
Blog में Email Subscription Widget कैसे Add करें
यहाँ पर हम आपको 2 Method बताएँगे आपको जो Method आसान लगे तो उस Method को Follow करना. अगर इस Widget को Blog में Add करने में कहीं दिक्कत हो तो हमे Comment में बताएं।
Method 1:
Step 1: सबसे पहले Blogger में Login करें फिर Blog के Dashboard में जाएँ।
- अब Layout पर Click करें
- अब उसी page में कही Add a Gadget पर Click करें
![]()
Step 2: अब यहाँ Follow by Email पर Click करें

Step 3: अब एक Popup Page खुलेगी
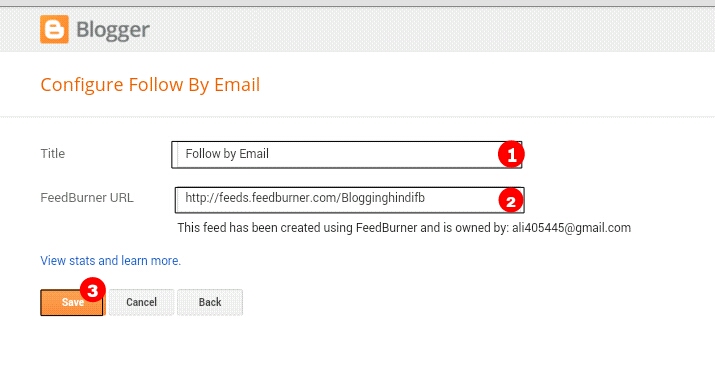
- यहाँ Widget की Title लिखें
- अब अपना Feedburner Link को लिखें
- अब Finally Save कर दीजिए
Method 2
Step 1: Blogger Login करने के बाद Blog के Dashboard पर जाएँ
अब Layout पर Click कर
- यहाँ कही भी Add a Gadget पर Click करें
- अब HTML/Javascript पर Click करें

Step 3: अब यहाँ Title लिखने के बाद निचे दिए गए Code को Past कर दीजिए
<style type='text/css'># sidebar-subscribe-box { background: url(http://1.bp.blogspot.com/-IyEBRR 8yOQQ/UBhYdBd23PI/AAAAAAAAFTU/aeW3 JdAlrCs/s1600/colored-strip.png) repeat scroll 0 0 transparent; border: 1px solid #aaa; border-radius: 3px; padding: 3px 0; } .sidebar-subscribe-box-wrapper { background: url(http://2.bp.blogspot.com/-tUlo5p 5gP8o/UBhYciGNgwI/AAAAAAAAFTM/x22 pIuNLVPw/s1600/bg-pattern.png) repeat scroll 0 0 #f7f7f7; color: #111; font-size: 14px; line-height: 20px; padding: 1px 20px 10px; text-align: center; text-transform: uppercase; } .sidebar-subscribe-box-form { clear: both; display: block; margin: 10px 0; } form.sidebar-subscribe-box-form { clear: both; display: block; margin: 10px 0 0; width: auto; } .sidebar-subscribe-box-email-field { -moz-border-radius: 4px; -webkit-border-radius: 4px; background: #fff url(http://1.bp.blogspot.com/- JMYdQsIa9WQ/UDZqxqqrTEI/AAAAAAAAFho/ AocEv70U8K8/s1600/sprites.png) no-repeat 0 -27px; border: 1px solid #ccc; border-radius: 4px; color: #444; margin: 0 0 15px; padding: 10px 40px; width: 68%; } .sidebar-subscribe-box-email-button { background: #09f; border: 1px solid #007fff; box-shadow: 0 1px 0 rgba(255,255,255,0.3) inset, 0 1px 0 transparent; color: #fff; cursor: pointer; font-family: verdana; font-weight: 700; padding: 10px; text-shadow: 1px 1px 0 rgba(0,0,0,.4); text-transform: uppercase; width: 100%; } .sidebar-subscribe-box-email-button: hover,.sidebar-subscribe-box-email- button:focus { background: #1ca4ff; } .sidebar-subscribe-box-email-button: active { -moz-box-shadow: 0 1px 4px rgba(0,0,0,0.5) inset; -webkit-box-shadow: 0 1px 4px rgba(0,0,0,0.5) inset; box-shadow: 0 1px 4px rgba(0,0,0,0.5) inset; outline: 0; } iframe,object,embed,.yt-border iframe,.yt-border object,.yt-border embed,table { width: 100%; } embed { border-radius: 3px; -moz-box-shadow: 0 2px 4px rgba(0,0,0,0.2); -webkit-box-shadow: 0 2px 4px rgba(0,0,0,0.2); background: #FFF; border: 1px solid #ddd; box-shadow: 0 2px 4px rgba(0,0,0,0.2); margin: 0; padding: 4px 4px 4px; } #footer-section { background: #f5f5f5 url(http://1.bp.blogspot.com/-n5s9Bu 0JCgg/UA_ AfQ5qLkI/AAAAAAAAFMU/G9FOuh4SP7k/s0/ bg-pattern.png) repeat top left; border-top: 1px solid #aaa; box-shadow: inset 0 4px 6px -3px #aaa; font-family: cambria; font-size: 14px; height: 100px; margin: 10px -30px 5px; padding: 0 30px; text-align: center; width: 100%; }</style> <div id="sidebar-subscribe-box"><div class="sidebar-subscribe-box- wrapper"><p>Subscribe to our email newsletter & receive updates right in your inbox. </p><div class="sidebar-subscribe- box-form"><form action="http:// feedburner.google.com/fb/a/ mailverify?uri=Blogginghindifb" class="sidebar-subscribe-box-form" method="post" onsubmit="window. open('http://feedburner.google.com/ fb/a/mailverify?uri=Blogginghindifb', 'popupwindow', 'scrollbars=yes,width =550,height=520');return true" target="popupwindow"> <input name="uri" type="hidden" value="labstrike" /><input name="loc " type="hidden" value="en_US" /> <input class="sidebar-subscribe-box- email-field" name="email" autocomplete="off" placeholder="Enter your email address :)"/> <input class="sidebar-subscribe-box- email-button" title="" type="submit" value="Subscribe करें" /></form></ div></div></div>
Note :» अब इस Code में http://feedburner.google.com/fb/a/mailverify?uri=Blogginghindifb के जगह में अपने Feedburner Account का Link Add करे और Finally Save कर दीजिए।